WINNIPEG KYOKUSHIN KARATE - DOJO ENTHEOS
UPPER BODY
STRENGTHENING PROGRAM EXERCISES
Additional Learning
|
|
WINNIPEG KYOKUSHIN KARATE - DOJO ENTHEOS Additional Learning |
|
| Lie on your stomach with your hands by your hips. Place a dumbbell or disc weight in the hand of the injured arm. Lower this arm down off the side of the table so that the hand is near the floor directly below the shoulder. Keeping your elbow straight, slowly lift that arm backward toward the ceiling with the palm facing up. Try to keep the front of your shoulder on the table as you raise your arm. Your hand should come up about 2 to 4 inches above the level of the table. Then, slowly lower your arm back to the starting position and repeat this exercise for 2 sets of 10 repetitions. You may rest for 30 seconds between sets. DO NOT CAUSE PAIN. |
 |
![]()
| Sit in a straight back chair and hold a weight in the hand of the arm to be exercised. Keeping the elbow straight, slowly lift that hand up in front of the body until it reaches a 90 degree angle directly in front of the shoulder. DO NOT CAUSE PAIN. Slowly lower the arm down to the starting position. This exercise should be performed a total of 20 times. A 30 second rest can be taken after the first 10 repetitions. DO NOT CAUSE PAIN. |
 |
![]()
| Lie on your stomach with your arms out in front of you. Place a dumbbell or disc weight in the hand of your injured arm and slowly raise that arm toward the ceiling approximately 4 inches. Keeping your elbow straight, slowly lower your arm back to its starting position on the table. Repeat this exercise 10 times. Rest 30 seconds and repeat 10 more times for a total of 20 repetitions. DO NOT CAUSE PAIN. |
 |
![]()
| Stand in front of a mirror. Place a dumbbell or disc weight in each hand. Your arms should be by at your sides with your palms facing in toward your legs. Rotate your palms outward as you slowly raise your arms out to the side of your body 90 degrees. DO NOT CAUSE PAIN. At the top of the lift, rotate your hands back down toward the floor and slowly lower the arms down to your starting position. This exercise should be performed ten times followed by a 30 second rest and a second set of 10 repetitions for a total of 20 lifts. DO NOT CAUSE PAIN. |
 |
![]()
| Stand in front of a mirror. Place a dumbbell in the hand of the arm to be exercised. Then place that hand in front of the hip of your opposite leg. The palm should be facing in toward the leg. Slowly lift the weight up and away from you diagonally across your body. As you are moving in this pattern, you should allow your hand to rotate so that the thumb is pointing out over your shoulder at the top of the lift. Lower the arm back slowly to the starting position, again rotating the hand to the starting position as you go. Do this exercise 10 times. DO NOT CAUSE PAIN. |
 |
![]()
| Lie on your Stomach with the hand of your injured arm in the small of your back at your belt level. Your palm should be facing the ceiling with the back of your hand on your spine. Place a small dumbbell or disc weight in that hand and lift it slowly up toward the ceiling. The elbow stays bent and the palm push up away from the belt approximately 2 to 4 inches. Slowly lower your hand back down to your belt and repeat this exercise 10 times. DO NOT CAUSE PAIN. |
 |
![]()
Lie on your stomach close to the edge of a firm table. Your elbow should be at a 90 degree angle to your shoulder, the upper arm resting on the table, ...the forearm and hand hanging over the edge of the table. The hand is directly below the elbow. (it may be a good idea to place a pillow between the table and upper arm for comfort.) Holding a weight in that hand, keep the elbow bent and at the level of the shoulder. It acts as a pivot point to the hand. Lift your hand up toward your head by rotating the shoulder. Slowly reverse this rotation by lowering the hand back down to the starting position. This exercise should be done ten times in a row followed by a 30 second rest and another set of ten repetitions for a total of 20 repetitions. DO NOT CAUSE PAIN. Lie on your side opposite the arm you will be exercising. Allow the elbow of the exercising arm to rest on your waist. The hand of that arm should be holding a weight and resting on the floor in front of your belly-button. Lift the weight up until it is parallel to the floor. The elbow stays bent and in contact with your waist, serving as the pivot point of the movement. Slowly lower the weight back down to the floor. DO NOT CAUSE PAIN. |
|
![]()
| Lie on your stomach on a table or firm surface. Your shoulder should be at a 90 degree angle, the upper arm resting on the table, and the elbow and forearm hanging over the edge of the table at a 90 degree angle. (it is a good idea to place a pillow between the table and upper arm for comfort.) Holding a weight in the hand of the exercising arm and keeping that elbow bent to a 90 degree angle, slowly bring the hand up to the rear to the level of your hip. Then slowly bring the arm back to the starting position. This exercise should be done ten times in a row followed by a 30 second rest and another set of ten repetitions for a total of 20 repetitions. DO NOT CAUSE PAIN. |
 |
![]()
| Stand facing a bare wall approximately 1 foot away from it. Reach both arms out in front of you to touch the wall. Let your palms rest firmly on the wall. Your elbows should be straight. Move forward or backward in order to feel comfortable with this reach. Slowly bend both of your elbows so your nose comes very close to the wall. Then slowly straighten your elbows back to the starting position. Do this exercise 10 times. When you find this easy, try the same thing but with one arm at a time. DO NOT CAUSE PAIN. |
 |
![]()
| Sit in a straight back chair and place , small weight in the hand of the arm to be exercised . This hand should be rotated so that its thumb points to the floor. The elbow should be straight. Keeping this arm at an angle halfway between the front of your body and the side of your body, lift that weighted arm up to the height of your shoulder. Slowly lower the arm back to the starting position. DO NOT CAUSE PAIN. |

|
|
|
![]()
| Sit tall in a straight back chair. Place a disc weight in the hand of the arm to be exercised. Holding the weight with your fingertips directly in front of your shoulder, have the back of the hand face the shoulder. The elbow should be out to the side of the body at shoulder height. Slowly push the weight out in front of your chest, straightening the elbow. Keeping the hand at shoulder height all the time, move the arm to your right and then to your left as if you are "crossing the letter t". The hand should then return to center and in to the starting position of the exercise. This exercise should be performed 10 times each day. DO NOT CAUSE PAIN. |
 |
 |
 |
![]()
| Sit on a chair and hold a dumbbell weight in the hand of the arm to be exercised. Rest the forearm of that arm on your thigh. Keeping the elbow steady as the pivot point of the exercise, slowly bend the elbow so that the weight comes up toward your face. Slowly lower the weight back down to the starting level. Repeat this exercise 20 times with a 30 second rest after ten repetitions. DO NOT CAUSE PAIN. |
 |
![]()
| Sit on a chair facing a mirror. Hold a dumbbell weight in the hand of your arm to be exercised. Raise that arm up to a position where the elbow is by your ear and your head is back by your shoulder bone. Keeping your elbow steady as the pivot point of the exercise, slowly straighten the elbow. Then, lower the weight back down to the shoulder by bending the elbow. Do this exercise 10 times. Rest 30 seconds and repeat again 10 more times for a total of 20 repetitions. DO NOT CAUSE PAIN. |
 |
![]()
| Buy or construct a pulley system and hang off a door or wall mounted hook. Stand facing the pulley system grasping an end with each hand. Keep the shoulders level to each other at all times. With your strong arm, pull your hand down so that the weak arm is stretched up toward the top of the pulley. Slowly reverse the action so the weak arm pulls the strong arm up to the stretched position. Repeat this 10 times on each side. DO NOT CAUSE PAIN. |
 |
![]()
| Place a wide office rubber band around the tips of all five fingers. Spread the fingers apart from each other as far as you can. Slowly release the tension of the rubber band, returning your hand to its starting position. You should do this at least 50 times a day. Very eventually, work up to 200 finger extensions per day. DO NOT CAUSE PAIN. |
 |
![]()
| Using the large rubber strip given to you by your therapist, tie the ends of the strip in a knot to form a large circular band. Then try the following exercises: | |
|
|
![]()
|
|
![]()
Shoulder Range of Motion Exercises
The shoulder is the most flexible joint in the human body. The anatomical structure of this joint enables it to have an incredible amount of freedom or range of motion. The ability to move the shoulder joint in a wide variety of directions is vital for complete functionality in sporting activities.
Increased mobility of the shoulder joint comes at the potential expense of joint stability. Therefore anyone can experience shoulder problems. Active young people, especially children and athletes often develop shoulder injuries. After the age of 25, many individuals develop shoulder pain from the wear and tear of routine activities. Individuals who reach middle age, and use their shoulders frequently in their specific occupation are particularly susceptible to problems. Other groups especially prone to shoulder problems are weekend athletes and do it yourself painters.
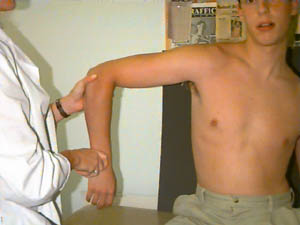
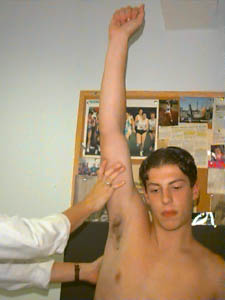
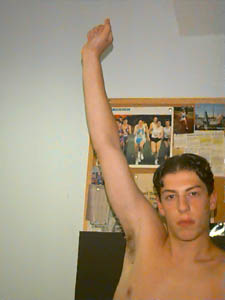
Early treatment is imperative for a good prognosis. So, if you have shoulder pain, see your doctor without any hesitation. It is natural to react to shoulder pain by not moving your shoulder, which can lead to complete loss of shoulder mobility. Your doctor may refer you to a physical therapist. After evaluation, an exercise program will be designed to keep your shoulder in motion. One good exercise which can improve motion and decrease shoulder pain is Codman's Exercise or Pendulum Exercise. This exercise may be performed in a prone (face-down) lying position or standing while leaning on a chair with the opposite arm.
![]()
![[Codman Exercise Image 1]](Exercise1_ShoulderExtension.jpg)
![[Codman Exercise Image 2]](Exercise2_ShoulderExtension.jpg)
![[Codman Exercise Image 3]](Exercise3_ShoulderExtension.jpg)
![]()
![[Codman Exercise Image 4]](Exercise4_ShoulderExtension.jpg)
![[Codman Exercise Image 5]](Exercise5_ShoulderExtension.jpg)
![[Codman Exercise Image 6]](Exercise6_ShoulderExtension.jpg)
![[Codman Exercise Animation]](Exercise7_ShoulderExtension.gif)
![]()
Understanding more about your Shoulder
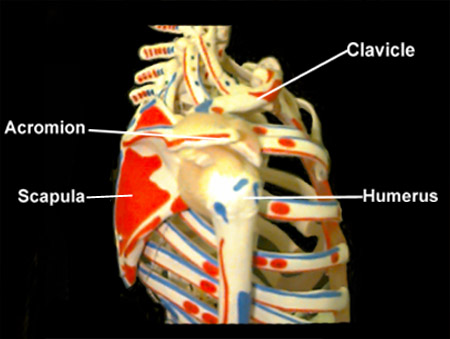
Anatomy
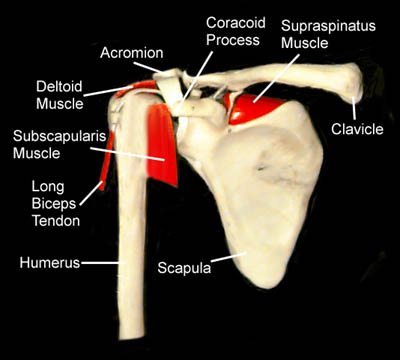
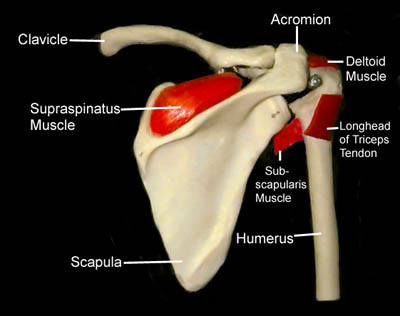
Functions of the Components of the Shoulder
|
||||||||||||||||||||||||||||||||||||||||||||||||||||||||||||||||||||||||||||||||||||||
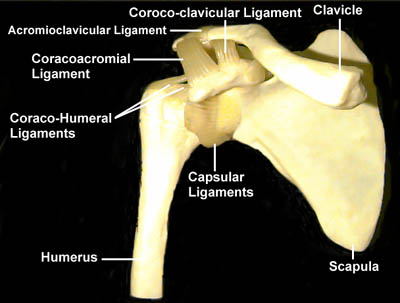
| Coracoacromial ligament: controls anterior and posterior translation of the lateral clavicle |
| Coracoclavicular ligament: controls vertical stability; restrains superior and anterior displacement |
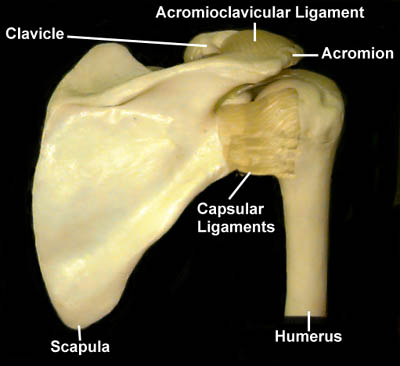
| Acromioclavicular ligament: provides stability across the joint; restrains posterior translation and displacement of the clavicle |
| Capsular ligaments: joins the glenohumeral joint capsule anteriorly, inferiorly, and posteriorly |
| Coracohumeral ligament: provides stability superiorly, preventing superior translation |
| The four major muscles of the rotator cuff rotate the humerus and properly orient the humoral head in the glenoid fossa (socket). The tendons of these four muscles merge, forming a cuff around the glenohumeral joint. |
| Supraspinatus: abducts the humeral head and acts as a humeral head depressor |
| Infraspinatus: externally rotates and horizontally extends the humerus |
| Teres minor: externally rotates and extends the humerus |
| Subscapularis: internally rotates the humerus |
![]()
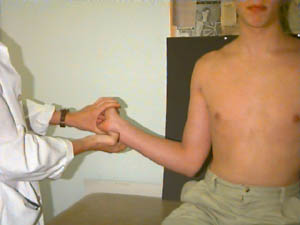
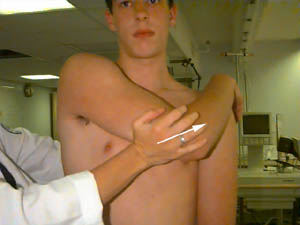
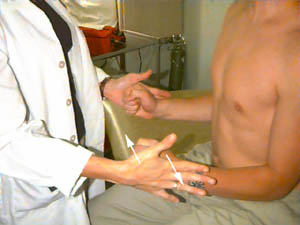
External RotationThe patient is positioned sitting and the elbow is flexed 90 degrees. While the elbow is held against the patient's side, the examiner externally rotates the arm as permitted. |
 |
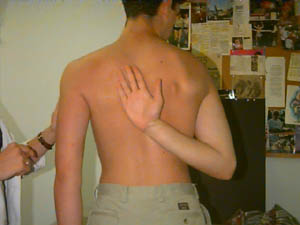
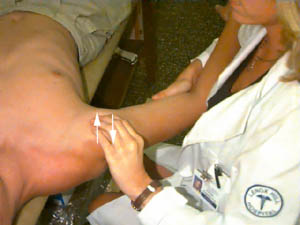
Internal RotationThe patient should be positioned sitting. Again with the elbows at the patient's side, the examiner should raise the thumb up the spine, and record the position in relation to the spine (reaching T7 is normal, unless bilateral symmetry is observed). |
 |
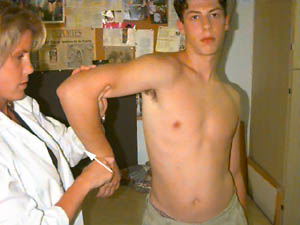
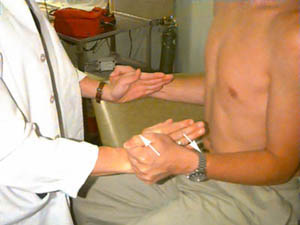
Internal Rotation at 90 degrees of Forward flexionThe patient is positioned sitting with the elbow and shoulder supported to prevent muscle contraction. The arm is at 90 degrees with the fingers pointing downward and palm facing posteriorly. The examiner attempts to rotate the forearm posteriorly as far as possible. |
 |
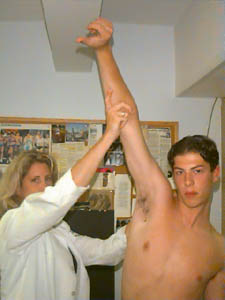
Forward flexionThe arm is kept straightened and brought upward through the frontal plane, and moved as far as the patient can go above his head. Note: for recording purposes, 0 degrees is defined as straight down at the patient's side, and 180 degrees is straight up. |
 |
Shoulder Abduction: Active TestThe arm is again kept straightened, while raised and abducted. Observe the twisting of hand -- facing outward, not forward, as in forward flexion. The ROM is measured in degrees as decribed for forward flexion. As pictured, this test is being done actively by the patient, but may be performed by the examiner as well. |
 |
|
|
|
Acromioclavicular (AC) Joint Testing |
|
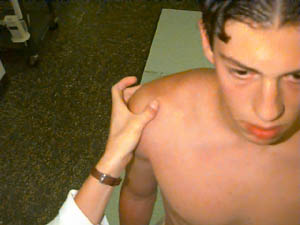
Palpation of AC JointThe patient's arm is kept at his side and the examiner palpates the AC joint for discomfort/pain and gapping. |
 |
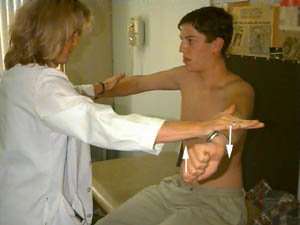
Cross-Arm Horizontal Adduction TestThe patient places his hand on the opposite shoulder, while the examiner exerts force horizontally. Again, the presence of pain indicates possible pathology. |
 |
|
|
|
Glenohumeral Laxity and Apprehension |
|
Apprehension TestHave the patient in the supine position, with the arm abducted 90 degrees. Rotate the shoulder externally by pushing the forearm posteriorly. If patient feels instability, they typically will balk when the test is performed. |
 |
Laxity TestHave the patient in the supine position. Stabilize the scapula, and slide the humeral head anteriorly and posteriorly within the glenoid fossa to evaluate the stability of the joint. Note the axial load being applied to the elbow. |
 |
|
|
|
Impingement Tests |
|
Impingement TestPosition the patient sitting. Internally rotate the arm with the thumb facing downward, and abduct and forward flex the arm. If impingement is present, the patient will experience pain as the arm is abducted. |
 |
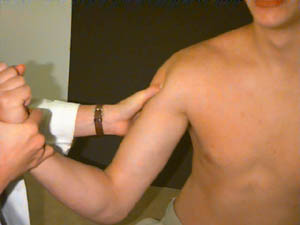
Hawkin's TestPosition the patient standing with the shoulder abducted 90 degrees, and internally rotate the forearm. The presence of pain with movement is indicative of possible pathology. |
 |
|
|
|
Strength Tests |
|
External Rotator Cuff (RC) StrengthPosition the patient sitting, with his arms at his sides and elbows at 90 degrees. It is important to maintain the elbow positioning at the sides while the external rotation is attempted by the patient (the examiner applies internal resistance). |
 |
Internal RC StrengthSame as above, but the patient is attempting to rotate internally (and examiner resisting externally). |
 |
Supraspinatus StrengthThe patient is positioned sitting with arms straight out, elbows locked, thumbs down, and arm at 30 degrees (in scapular plane). The patient should attempt to abduct his arms against the examiner's resistance. |
 |
Palpation of Bicipital GroovePosition the patient sitting, beginning with the arm straightened. The patient should then flex his arm to contract the biceps muscles. The examiner palpates the bicipital groove to attempt to illicit pain. |
|